How To Add Third Party Freight in Order Entry
Beginning with the deployment of Merchant Ag v 4.0.2, the option to add Third Party Freight to Orders and process Order Entry Freight invoices is now available. This new functionality is enabled in Access Parameters and by granting permission to User Profiles in Access User Profiles.
Prerequisites
Merchant Ag FIN
- Select OE Parameters and enter Freight General Ledger accounts
- Grant User Permissions for Order Entry, Accounts Payable, and Reports
Merchant Ag PM
- Add Freight COGS General Ledger account to Item Categories
- Schedule Print Freight Accrual Report SRV task
Merchant Ag Financial
Enable the new functionality for Third Party Freight in Order Entry by navigating to Merchant Ag FIN > Admin > Installation > Access Parameters > OE > Options and select the new parameter Enter Freight on Orders.
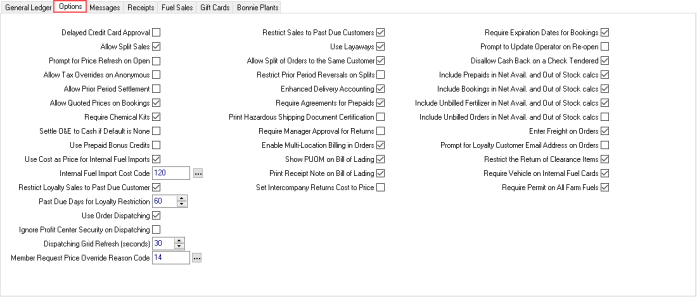
Select the General Ledger tab, enter a General Ledger account for both Freight Accrual Account and Freight Closing Account.

Grant User Permissions
Order Entry
Order Entry staff who will enter Third Party Freight will need access granted to this new functionality in their User Profile. Select Admin > System Security > Access User Profiles > Security > Orders Module and scroll down to Access Open Orders > Enter Freight Information and select 1 to allow the user to enter freight information.
Accounts Payable
The Users who will enter Order Entry Freight invoices need access granted by selecting Accounts Payable as the Module on the Security tab. Scroll to the option Enter OE Freight Invoices and set the Level to 1 to grant access. For Users who will have the option to mark an OE Freight invoice as Complete need Allow OE Completion set to 1 as the Level of permission.
Reports
Grant access to the users who will utilize the new Freight Accrual report by selecting Security tab > Reports > scroll down to the Orders section and grant Level 1 permission to the report.
Merchant Ag PM
In Merchant Ag PM, enter a Freight Cost of Goods General Ledger account on all applicable Item Categories found in Setup > Access Categories > GL. Enter either a Sub or Full GL account or select F12 to search.

Add Third Party Freight to an Order
In Merchant Ag PM create a new order using Access Open Orders from the Orders menu or the F1 Order icon.
Add Third Party Freight by clicking the new F1-Freight button now available within the Order to open the Freight Information window. Orders created by cloning a Closed Order do not include any Third Party Freight entered on the original order.
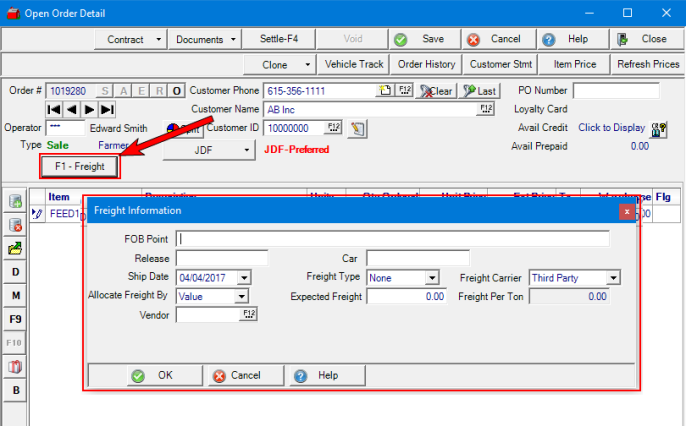
In the Freight information window, provide
- A FOB Point, up to 30 alpha-numeric characters °
- Release allows up to 15 alpha-numeric characters °
- The Ship Date defaults to the current date and can be updated using the drop down calendar or entering a date using the mm/dd/yyyy date format. °
- Allocate Freight By- choose Value, Weight or $ / ton
- Vendor- Enter the Freight Vendor ID or search using the F12 button. °
- Car allows up to 15 alpha-numeric characters °
- Freight Type can be selected of None, Prepaid or Collect °
- Expected Freight- enter any Expected Freight amount to be recorded as the Freight Cost.
- Freight Carrier- defaults to Third Party
- If $ / ton is selected as the Allocate Freight By option, enter the amount of Freight Per Ton.
Fields marked with ° print on all documents.
Click OK to add the Freight information which also displays "Freight Added" to the right of the F1-Freight button.
When Orders are settled, the amount of Freight will be credited to the Freight Accrual account set in Access Parameters and a debited to the Freight COGS Account set in Item Categories.
If Third Party Freight is added to an order that contains Items without a Freight COGS GL account defined in Item Categories, the amount of freight allocated to the Items will be debited to a suspense account.
New Report! Freight Accrual
Use the new Freight Accrual report to view Closed Orders with Third Party Freight not marked Complete.
Navigate to Merchant Ag PM > Reports > Orders and select Freight Accrual.
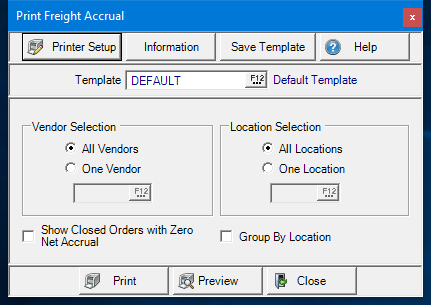
All Vendors are selected by default. Focus the report on one Freight Vendor by entering the Vendor ID or use F12 to search.
Select Show Closed Orders with Zero Net Accrual limits the report to Orders where the Settled Freight entered as Expected Freight on the Order, and AP Freight amount, are equal.
Filter the report by Locations by entering a Site ID, use F12 to search, or retain the default selection of All Locations. Group the report results by selecting the Group By Location checkbox.
Select Preview to view the report onscreen.
Select Print to send the report directly to the default printer.
Review the sample report below for a Freight invoice entered but not marked as Complete for an Order.
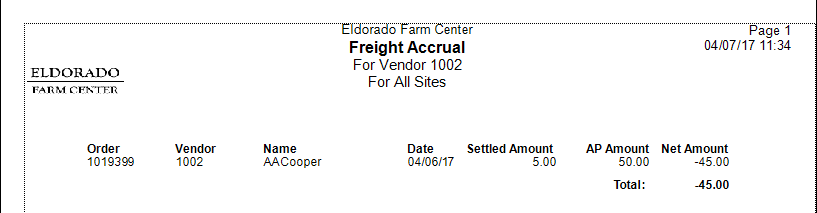
Note the Net Amount will show any difference between the Settled Amount, the amount entered as Expected Freight on the Order, and AP Amount, what was entered as the actual Freight amount from the invoice.
Schedule the new SRV task
Generate the Freight Accrual report on a nightly basis for historical reporting purposes by navigating to Services > View Schedule and move the SRV task, Print Freight Accrual Report, to the Daily tab and enter a start day and time and set the task to Active.